Diablo 3 Wizard Cosplay - This is the process :)
Last May, I was in search for a cosplay to wear for Pax Prime 2012. I
wanted something that would challenge my skills and at the same time
showcase what I already knew. I love video games, especially those with
strong female characters, and had several options to pick from. A wood
elf Dragonborn from Skyrim, Hellequin from Assassin’s Creed:
Brotherhood, a Guild Wars 2 Sylvari, and Satele Shan – Grand Jedi Master
from Star Wars: The Old Republic — were all in the running. But when I
saw the wizard concept art, I think I had an epiphany. Being fan of
Diablo series, of course I would be the kick-ass caster!! Why would I be
anything else?! I also found the background story of the Wizard Li-Ming
intriguing — her beauty, character, her arrogance, her power, and her
beginning are just amazingly developed! It is with this state of mind
that I pour my heart into creating every aspect of the costume. There
are a lot of props in this cosplay, and without them properly executed, I
wouldn’t have half the impact as needed. So I recruited the help of my
cosplay partner Hillary to create those for me. To Read about Hillary's process, please go here!
I studied the concept art closely to first draft out the basic silhouette and shapes. In this process I also mentally take notes of the major seams, and garment pieces, and play in my head any special areas I need to pay attention to.


After the initial sketch, it is time to drape the whole thing in muslin. For this 1st draped pattern, I used 1/8″ felt as the base to support the collar. I also only draped half the lower body and sleeves to save material and work, because it would be symmetrical on both sides. I revised the shoulder + collar shape after a few hours of manipulating, I refined the shoulder pieces height to be less dramatic, but more along the line of the sketch.
For fabric choices, I used a bright red crêpe de Chine, a white crepe
de Chine brocade with white on white pattern, a red dragon and phoenix
brocade, a black on black chrysanthemum brocade, a gold scroll brocade,
vinyl leatherette, 20 yards of handmade gold bias bindings in both 2″
width and 1″ width and miles of rayon chainette yarn. :) I also used
foam and jewelry components to make the crown and charms for the first
version of this cosplay.
For findings, I used extra wide white horse hair heavy fusible interfacing, 1/2″ boning, 1/8″ felt, Gold embroidery thread, gold chains in thick and thin gauge, black 1″ elastic, acrylic gem stones, gold fabric and acrylic paints, 1/4″ gold ribbons, and matching colored thread.
Before I started to cut out the pattern pieces in main fabrics, I prepared these small parts
1, Made 2” and 1.5” bias strips from gold scroll brocade – this was so that all outside edges could be finished with the beautiful details of binded seams.
2, Gold piping with 1.5” bias strips and cording – this was to insert into detailed seams so it shows decorative edgings.
3, used 9 strands of chainette yarn to braid about 7 yards of rope – used on the belt, back medallion
4, cut out about 10 yards of 1/2” strips, and 1/4” strips of red crêpe de chine – used on the staff, wig, and back medallion.
Pattern pieces included:
Shell pieces:
Back body Cut 1 on fold – red dragon and phoenix brocade
Front body cut 2 – red dragon and phoenix brocade
Side Leather panels Cut 4 – Brown leatherette + Gold piping + Gold Chain + Gold beads
Back collar cut 1 on fold – black brocade + gold brocade accent pieces + Gold Bias binding + double fused interfacing
Front collar cut 2 – black brocade + gold brocade accent pieces + Gold Bias binding + double fused interfacing
Back under collar cut 2 – gold fabric + Gold Bias binding + double fused interfacing
Front under collar cut 2 – gold fabric + Gold Bias binding + double fused interfacing
Sleeve Cut 2 – red crêpe de Chine
Center front + Center Back skirt panel Cut 2 – red crêpe de Chine + Gold ribbon
Side front and side Back skirt panels Cut 4 – red crêpe de Chine + Gold ribbon
Large triangle Gussets for skirt cut 2 – red crêpe de Chine
Lining pieces:
Back body Cut 1 on fold – white crepe de Chine brocade
Front body cut 2 – white crepe de Chine brocade
Bias Neck binding – white crepe de Chine brocade in 2.5″ bias binding
Sleeve insert cut 4 – white crepe de Chine brocade
Front sleeve heads cut 2 – Gold brocade
Back sleeve heads cut 2 – Gold brocade
Center front + Center Back skirt panel Cut 2 – white crepe de Chine brocade
Side front and side Back skirt panels Cut 4 – white crepe de Chine brocade
Waist clincher/Belt:
Waist belt – black brocade + boning + Gold piping + white 2.5″ bias binding + double fused interfacing + large hook and eyes + stiff white linings + braided red chainettes
Center Front Long Tab -Black Brocade + Gold Bias Binding
Tassel – Red Chainette
Side Spell scroll Tab – Black vinyl leather + gold bias binding + Red crepe de Chine + Acrylic gems
Various Gold chain, gold wire, and jewelry parts decorates the
Side pouch – Brown Vinyl Leatherettes + horn button
Side hip medallion – Jade pendant + chain + leafy jewelry parts
The large thick gold robes are curtain tie backs
It is closed at the center back with Velcro + 2 sets of heavy weight hook and eye
Back Medallions – Green beads + Braded Chinese knot + 1″ red Stripes
Various Components from Hillary’s portion
Boots:
Boot base from Goodwill, with extra decorations and parts removed to reduce bulk
Boot cover – Brown leatherette + gold piping + red braided ropes + elastic + zippers


Bracers:
Top Cover Cut 2 – Red Dragon and Phoenix brocade, I cut one with the phoenix pattern and one with dragon pattern positioned in the middle + 1/4″ felt + Elastic
Under layer Cut 2 – Red Dragon and Phoenix brocade + 1/4″ felt + Elastic
Wig -
Wig was purchased from Epic Cosplay
Wrapped sections – Elastic + 1/4″ strips + 1/2″ Strips + gold ribbon
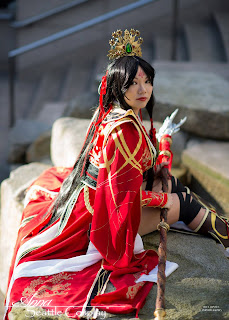
Only few people know, but there has been a Version 1 and Version 2 of this cosplay. I have a wonderful goal and vision of this cosplay on me, but needless to say there are many technical difficulties that we faced during the PAX Prime debut. I couldn’t get the perfect cosplay in time for PAX, but we did not give up and this year’s Sakura Con was another chance for us to shine! Again, thank you Hillary for making my dream come true and thank you Bill Hinsee for taking these awesome photos!
I studied the concept art closely to first draft out the basic silhouette and shapes. In this process I also mentally take notes of the major seams, and garment pieces, and play in my head any special areas I need to pay attention to.


After the initial sketch, it is time to drape the whole thing in muslin. For this 1st draped pattern, I used 1/8″ felt as the base to support the collar. I also only draped half the lower body and sleeves to save material and work, because it would be symmetrical on both sides. I revised the shoulder + collar shape after a few hours of manipulating, I refined the shoulder pieces height to be less dramatic, but more along the line of the sketch.
For findings, I used extra wide white horse hair heavy fusible interfacing, 1/2″ boning, 1/8″ felt, Gold embroidery thread, gold chains in thick and thin gauge, black 1″ elastic, acrylic gem stones, gold fabric and acrylic paints, 1/4″ gold ribbons, and matching colored thread.
Before I started to cut out the pattern pieces in main fabrics, I prepared these small parts
1, Made 2” and 1.5” bias strips from gold scroll brocade – this was so that all outside edges could be finished with the beautiful details of binded seams.
2, Gold piping with 1.5” bias strips and cording – this was to insert into detailed seams so it shows decorative edgings.
3, used 9 strands of chainette yarn to braid about 7 yards of rope – used on the belt, back medallion
4, cut out about 10 yards of 1/2” strips, and 1/4” strips of red crêpe de chine – used on the staff, wig, and back medallion.
Pattern pieces included:
Shell pieces:
Back body Cut 1 on fold – red dragon and phoenix brocade
Front body cut 2 – red dragon and phoenix brocade
Side Leather panels Cut 4 – Brown leatherette + Gold piping + Gold Chain + Gold beads
Back collar cut 1 on fold – black brocade + gold brocade accent pieces + Gold Bias binding + double fused interfacing
Front collar cut 2 – black brocade + gold brocade accent pieces + Gold Bias binding + double fused interfacing
Back under collar cut 2 – gold fabric + Gold Bias binding + double fused interfacing
Front under collar cut 2 – gold fabric + Gold Bias binding + double fused interfacing
Sleeve Cut 2 – red crêpe de Chine
Center front + Center Back skirt panel Cut 2 – red crêpe de Chine + Gold ribbon
Side front and side Back skirt panels Cut 4 – red crêpe de Chine + Gold ribbon
Large triangle Gussets for skirt cut 2 – red crêpe de Chine
Lining pieces:
Back body Cut 1 on fold – white crepe de Chine brocade
Front body cut 2 – white crepe de Chine brocade
Bias Neck binding – white crepe de Chine brocade in 2.5″ bias binding
Sleeve insert cut 4 – white crepe de Chine brocade
Front sleeve heads cut 2 – Gold brocade
Back sleeve heads cut 2 – Gold brocade
Center front + Center Back skirt panel Cut 2 – white crepe de Chine brocade
Side front and side Back skirt panels Cut 4 – white crepe de Chine brocade
Waist clincher/Belt:
Waist belt – black brocade + boning + Gold piping + white 2.5″ bias binding + double fused interfacing + large hook and eyes + stiff white linings + braided red chainettes
Center Front Long Tab -Black Brocade + Gold Bias Binding
Tassel – Red Chainette
Side Spell scroll Tab – Black vinyl leather + gold bias binding + Red crepe de Chine + Acrylic gems
Various Gold chain, gold wire, and jewelry parts decorates the
Side pouch – Brown Vinyl Leatherettes + horn button
Side hip medallion – Jade pendant + chain + leafy jewelry parts
The large thick gold robes are curtain tie backs
It is closed at the center back with Velcro + 2 sets of heavy weight hook and eye
Back Medallions – Green beads + Braded Chinese knot + 1″ red Stripes
Various Components from Hillary’s portion
Boots:
Boot base from Goodwill, with extra decorations and parts removed to reduce bulk
Boot cover – Brown leatherette + gold piping + red braided ropes + elastic + zippers


Bracers:
Top Cover Cut 2 – Red Dragon and Phoenix brocade, I cut one with the phoenix pattern and one with dragon pattern positioned in the middle + 1/4″ felt + Elastic
Under layer Cut 2 – Red Dragon and Phoenix brocade + 1/4″ felt + Elastic
Wig -
Wig was purchased from Epic Cosplay
Wrapped sections – Elastic + 1/4″ strips + 1/2″ Strips + gold ribbon
Only few people know, but there has been a Version 1 and Version 2 of this cosplay. I have a wonderful goal and vision of this cosplay on me, but needless to say there are many technical difficulties that we faced during the PAX Prime debut. I couldn’t get the perfect cosplay in time for PAX, but we did not give up and this year’s Sakura Con was another chance for us to shine! Again, thank you Hillary for making my dream come true and thank you Bill Hinsee for taking these awesome photos!


Comments
Post a Comment